
Whether you want to capture friends and relatives making funny faces on Skype or need accessible photos of online resources or programs, screenshots benefit users in many ways. Since the Surface Pros are a bit different than other 2-in-1 laptops, however, you may find yourself wondering how to take a screenshot on one. Here, we take the mystery out of the
But what if you want to take a screenshot on a tablet? Most methods for doing so feature capturing an image via a button combination or tool. For Microsoft Surface users, there are several separate methods for capturing screenshots of your tablet’s display.
Whether you’re utilizing a Touch or Type Cover, use the tablet by itself, or rely on a Surface Pen, our extensive guide will have you taking screenshots on your Surface in no time.
Using buttons
These units don’t have a Windows button, but you can still take a screenshot. Here's how:
Step 1: Hold down the Power button.
Step 2: Press the Volume up button.
Again, the screen will flicker, and the screenshot saves to the same location.
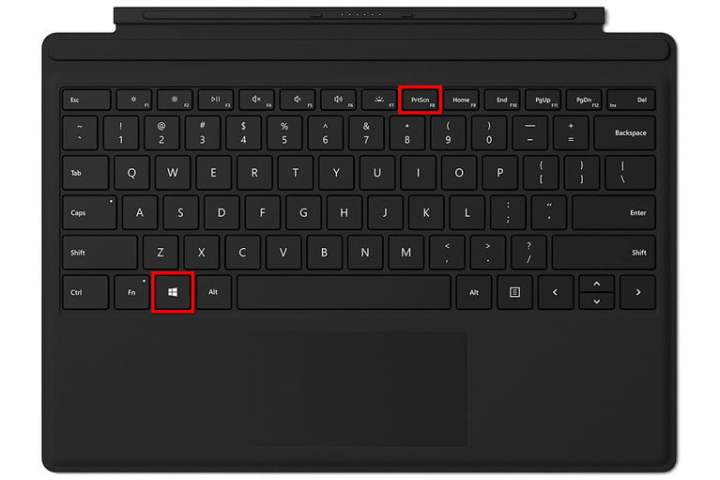
Using the Type Cover
There’s no Windows button on the tablet itself, but the Type Covers do include a Print Screen feature. It’s located on the F8 key, meaning the Function key needs to be disabled first. Press it, and the tiny LED turns off, signifying that the Function keys are disabled.
- PrtScrn: Saves to the clipboard only, unless OneDrive stashes screenshots in the cloud.
- Windows + PrtScrn: Saves to the local Screenshots folder.
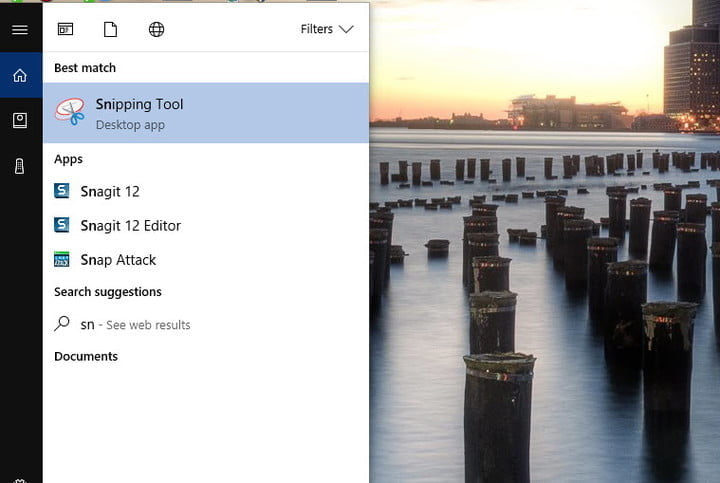
Using the Snipping Tool
The Snipping Tool lets you take screenshots of either the entire display or sections of it.
Step 1: Type “snip” in the taskbar’s search field and either left-click on the icon to open the application or right-click the icon to pin it to the Start Menu or taskbar.
The Snipping Tool provides a few options once it’s open: New, Mode, Delay, Cancel, or Options.
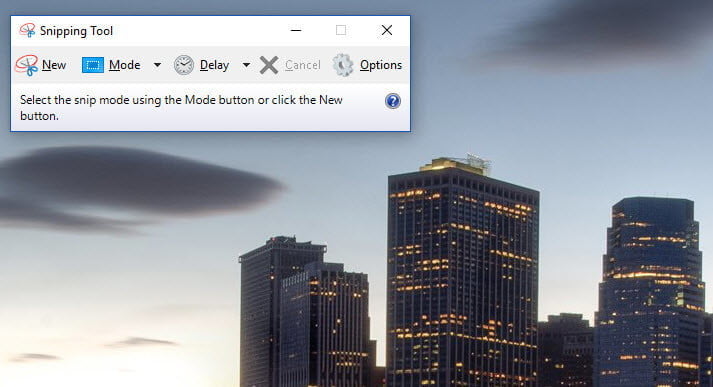
Step 2: Select one of four modes:
- Free-form snip: Use your mouse, finger, or pen to capture a custom area.
- Rectangular snip: Capture a precise, manually selected rectangular area.
- Window snip: Capture a specific window, like a browser.
- Full-screen snip: Capture the entire screen.
Step 3: Select New, and respond accordingly.
For example, with Rectangular Snip, the cursor turns into a set of crosshairs that can then be used to create a capture field encompassing a specific portion of the display. Simply drag the resulting cursor over the target area before releasing it to capture the screenshot.
Step 4: Save the screenshot in any location as a JPEG, PNG, or GIF file. Annotate the clip using a Surface Pen, if available.
Surface Duo
Microsoft provides two ways to take a screenshot on its Surface-branded phone.
Step 1: Press and hold the Power button.
Step 2: Select Screenshot.
Alternatively, press and hold the Power and Volume down buttons simultaneously. The capture goes to the Albums > Screenshots folder in the Photos app.
Using a Surface Pen
The Surface Pen utilizes an active digitizer within the display, allowing for clearcut precision and detailed pen input. This tool also offers buttons you can customize that give you the ability to perform tasks like erasing, writing, opening apps, and more. One of the Surface Pen’s best and most convenient features is saving screenshots to OneNote on either the app or a desktop.
We’ll go over a few steps below to show you how you can configure your Surface Pen button. It’s a straightforward process:
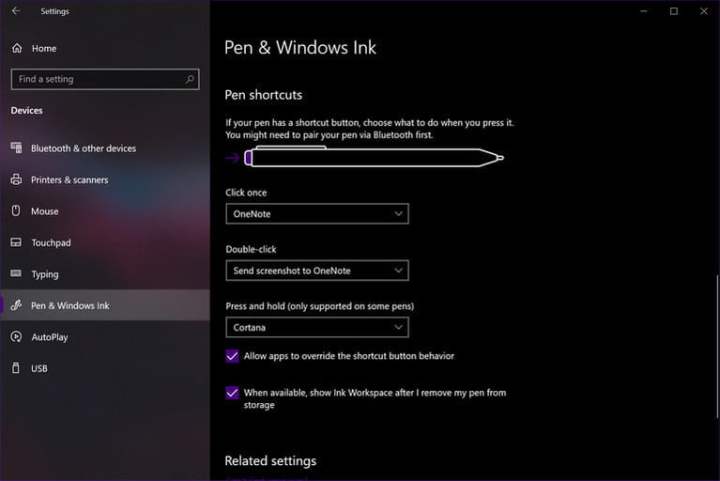
Step 1: Go to the Action center and select the All settings option.
Step 2: From the Settings app, select Devices from the list.
Step 3: Look for the Pen & Windows Ink on the left and select it.
Step 4: Scroll all the way down until you see Pen shortcuts for personalizing the Click once, Double-click, and Press and hold assignments. It’s worth noting that the choices available will largely depend on what type of Surface Pen model you have access to.
So, that's how you can take a screenshot on your Microsoft Surface Pro. If you're a bit irritated with the system or just want to try something new, check out these Microsoft Surface Pro alternatives that will be easier to take screenshots on.
Editors' Recommendations
- How to turn off Sticky Keys in Windows 11
- How to create a drop-down list in Excel on Windows and Mac
- How to force quit on Windows to fix frozen applications
- How to share an external hard drive between Mac and Windows
- How to measure your PC’s power use, and why it matters


